Wallpapers for Mobiles
Hopefully you've already read the introduction to making wallpapers for mobiles.
Here's the next step ... on this page I'll show you how to can pep up your photo before you load it so that your mobile's wallpaper looks a lot more professional!
I'll also show you an extra tip to give your mobile phone's icons a bit of extra clarity when you have installed your wallpaper.
First of all, let's make your wallpapers really pop!
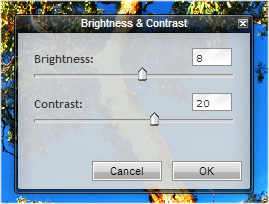
Go to the menu bar at the top of the Pixlr window and choose 'Adjustment' and then click on 'Brightness and Contrast...' in the drop down menu.
A dialog box like the one below should appear:

In the dialog box move the contrast slider up a bit (this is the important one!). You might also want to move the brightness slider up a little too.
Once done, that should give your wallpaper a bit more zing. But there's one more step ...
... to make wallpapers for mobiles really look professional...
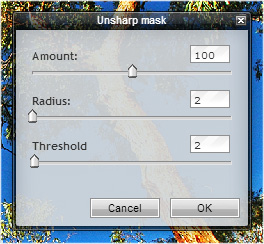
...go back to the menu bar in Pixlr and choose 'Filter' and then select 'Unsharp Mask...' Despite it's name, this will actually make your wallpaper sharper and clearer. When the dialog box pops up you'll see three sliders.
⇒ Set the first one ('Amount') to '100' (you can type in the box if it's easier),
⇒ set the middle one ('Radius') to 2
⇒ and then move the final slider ('Threshold') up and down until you like what you see.
*Try this ...
try moving the 'Amount' slider all the way up as far as it goes. Your wallpaper will really begin to look unusual - but in a good way! If you don't like the effect, just move it back.
When you're finished click 'OK' and you're almost there.
Wallpapers for mobiles - make icons easy to read
I say you're almost there, because wallpapers for mobiles, uploaded onto a phone in their usual way, can make your phone icons a bit difficult to read.So, here's a way to make sure your wallpapers give your icons a bit of extra clarity.
Back to Pixlr, first make a copy of your wallpaper on a new layer. You can do this by going to 'Layer' in the menu bar and then clicking on 'Duplicate layer'. Once done, you'll see a copy of your wallpaper in the layers palette.
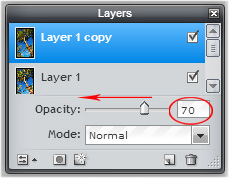
See the screenshot below - it will be on the right side of the Pixlr window. The new layer you just created will be highlighted in blue.
 Then go to 'Filter' on the menu bar and choose 'Gaussian blur'. In the dialog box that pops up change the 'Amount' to about 70.
This blurs your wallpaper, but don't panic!
Go to the layers palette again, make sure you're copy layer is still highlighted (in blue), and then click on the small icon in the bottom left corner of the palette - it's the one with the double arrow on it.
A small pop up appears in the palette itself with a slider called 'Opacity' - move this slider to about 70 (circled in red in the screenshot).
This will allow the sharpened, original, layer below to show through, with a misty effect of the blurred layer over the top.
This effect is called soft focus. The photo is still sharp, but has a soft overlay.
With regard to wallpapers for mobiles it's an important step because, once loaded onto your phone, the softness will sit nicely under you icons, and you icons will appear much clearer as a result.
So there you go. Find some of your own photos that you like, do a spot of editing, and you'll be making wallpapers for mobiles in next to no time!
