Painting with light – really creative photography!
Painting with light is a creative photography technique that can be done with film photography.It's a photography technique that's easy to do provided you know a few basics.
I'll show you how you can take your first light painted photo and show you some great photography ideas too.
I'll also show you where you can get hold of the best eBook ever written for creative photographers, including plenty of ideas for painting with light.
First things first, the equipment you'll need:
- A camera that can you can set a really slow shutter speed on
- A tripod - or at least somewhere solid you can support your camera on whilst you paint with light.
- A light source (at least one, more will allow for even more creative photography)
 The basic concept of painting with light involves having a stationary object (in the photo here it's the apple) and having a moving light.
It's the moving light that leaves the trails in this photo and creates the effect.
So how was this photo taken? The apple was set up on a solid surface, the camera was set up on a tripod and the room was darkened.
The camera's shutter speed was set to stay open for a few seconds. Then the shutter button was pressed.
Whilst the shutter was open a small LED light was waved around the apple.
Where the LED light goes a trail is left and the apple is illumunated by the light spilling from the LED.
This gives you a basic overview of how the photo was taken. You can get more in-depth information here.
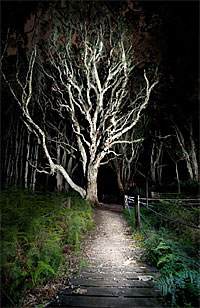
 This second photo is an example of painting with light outside using a torch.
As with the apple shot the camera was set on a tripod and the shutter open for a good few seconds.
This time whilst the shutter was open the torch was used to "paint" the tree with light. Basically this means shining the beam up and down the tree a few times.
This is easier to do if you rope an assistant in to help you as you can stay with the camera and your assistant can paint the tree.
Having two of you out there also makes things safer for you. Please, please be careful when setting a camera up outside at night. It's unlikely anything will happen to you, but better to be safe than sorry.
One final point about painting with light outside like this - make sure you (or your assistant) moves around a bit. That way you won't show up on the photo!
If you like the look of this sort of photography here's where you'll find more creative photography tips.

But as you've probably picked up by now the key to this technique is having a dark place and moving light around whilst the shutter is open.
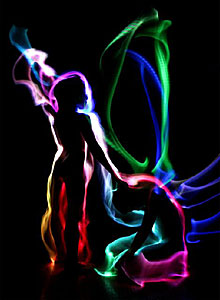
Understand that and you'll probably already have worked out how this final image was taken - with the help of two people who were persuaded to stand (or crouch!) motionless in a darkened room.
Yep - they kept still in their position as a multi-coloured fibre optic light was waved around them. As the fibre optic light changed colour the different colours showed up on the exposure.
The other examples on this page the camera was set up on a tripod and an exposure of a few seconds was made.
However, painting with light is just one area of creative photography so if this has got your creative juices flowing you could try your hand at some other techniques.
Ideally get hold of a book that will provide you with plenty of ideas - the more ideas you see the more creative you'll find you get. I know of a great little eBook that's packed with creative photography ideas.
Substantial - it's 190 pages long - it covers not just painting with light but also use of unusual perspectives, multiple exposures, flowing water, star trails . . . the list goes on and on. If you think it's something you'd be interested in you can find out more here.
UPDATE: The eBook is now in its second edition and runs to 295 pages. Plus it now includes 9 hours of "how-to" video. And if that wasn't enough to keep your creative side happy there's currently a four eBook bonus pack too. Here's where you can get more information.
- Further reading:
- How to use your shutter speed for creative photography
- Night photography tips
- Trick photography
- more trick photography effects - create a ghost photo
