Circular Polarizing Filters
As mentioned on the intro page, circular polarizing filters have been around for years, and still do a job for photographers that can't be replicated using Photoshop.
If you don't know what they are, or how it does its job, nip back a page to find out. You'll also find our about one of their primary uses - reducing reflections on water.
So what else can they do?
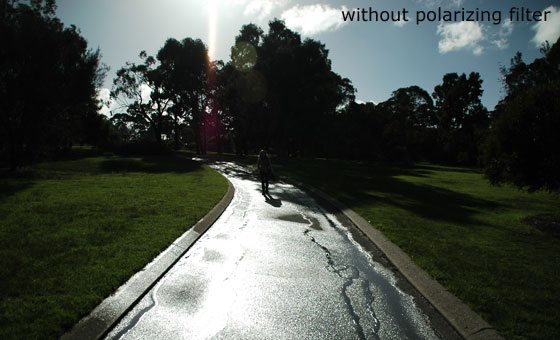
Reducing reflections on water is one valuable use. But reducing reflections on other surfaces works just as well. Take the example of the photo below:


In the first photo above (again, not my best work, but a good illustration!), shot into the light, the water on the path is really bright.
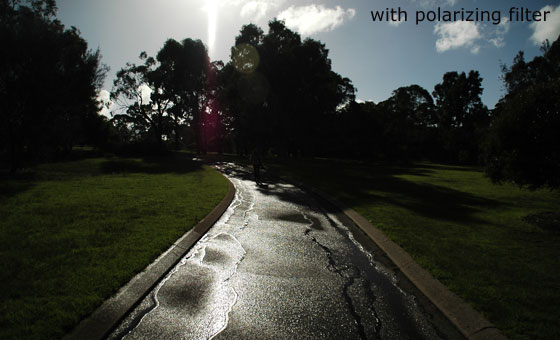
By using a circular polarizing filter it's easy to reduce that reflection. Attach the filter to your lens, give the filter a twist, and you can reduce the reflections.
The second shows the same scene with the filter attached - the reflections are still there, but greatly reduced.
This effect of reducing reflections works well on water, on wet pavements, on glass ... in fact, on any surface where there are reflections, a circular polarizing filter can help reduce them.
So, we can reduce reflections. Nice touch, but that's not all.
Use a circular polarizing filter to get really blue skies
Have you ever seen photos with lovely blue skies, compared them with yours, and wondered where were they when they took that photo?
Well, it's very likely that the sky was just a normal sky, the same as everywhere else, but the photographer used a polarizing filter to really bring out the blue-ness.
When you look up at the sky, it probably seems quite blue, but, because so much light is bouncing off it, in all directions, it takes away some of the blue-ness.
Remember how a circular polarizing filter is like a set of microscopic venetian blinds? Well, what if you twist it a little to block out light from one angle?
That would ...
... allow more of the blue to shine through!
And with more blue, your photos can also take on that professional quality.
The two examples below show this effect nicely.

|

|
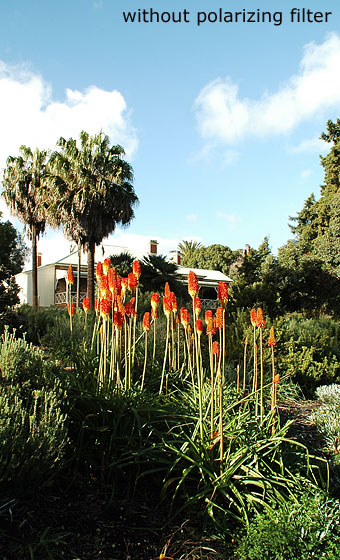
Nothing really wrong with it.
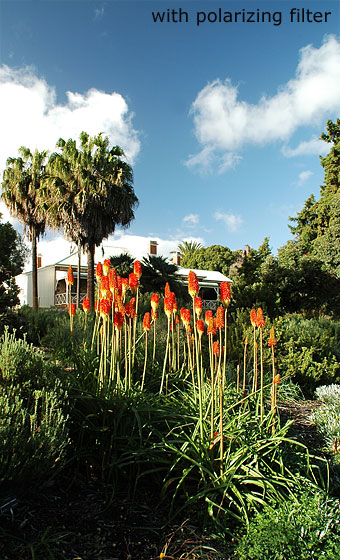
Until you compare it to the second photo where the circular polarizing filter is attached.
What a difference! A much more professional looking photo.
But look closely ...
There's more to it than just the bluer sky.
Look at the clouds too - in the first photo they are a bit washed out.
That's an effect called 'blown highlights' - it tends to lead to big areas of white with a lack of detail.
Now go back to the second photo and compare the clouds. Much more detail is preserved in the second photo.
And there's something else to notice too.
Often, when filters are used on cameras they tend to affect the whole image, even the bits you don't want affected.
But look again at what the filter has done; it's made the sky bluer and the clouds more defined, but the rest of the photo is untouched.
The plants in the foreground for example look exactly the same as before.
So many benefits, there must be a downside?
After reading this far, you'll probably be wondering why photographers don't walk around with these filters permanently attached to their cameras.
Sadly, this isn't as perfect as you might imagine.
Sure, you can cut down on reflections. Yes, you can improve the look of skies.
But ... there's always a but!
There are some things to bear in mind when using circular polarizing filters. Read on to discover why we don't leave them attached to our cameras all the time.
the downsides ⇒ ⇒ ⇒
