June 14, 2007
Welcome to the digital-photography-tips.net monthly ezine.
If you’ve been subscribed for a while, there’s one small change this month. Previously, to access the members only pages you had to enter a password. I had a lot of messages from members who found the whole password thing a little annoying. So I’ve added the content that would have gone on the site directly here instead.
As always, if you have any comments please don’t hesitate to let me know, I genuinely love hearing from you!
This month . . .
- Photogenic places of the World - Prague
- Tutorial on Photoshop’s transform tools
- New additions to the site
Photogenic places of the world - #2
The Old Town Square - Prague
 This month’s photo is one I took a few years ago in Prague. The photo is of the Old Town Square, dominated by the Church of Our Lady of Týn.
Prague is a great place for photographers. The old gothic buildings came through the second world war relatively unscathed. Consequently there’s lots of old architecture to aim your camera at!
The only downside to photographing all those old buildings is that we often get what is called “converging verticals”. Because of the angle you have to shoot at, the vertical lines of the buildings tend to lean inwards.
There’s little you can do while you are out taking photos. The fix comes later in Photoshop. Keep reading for a simple tutorial on fixing converging verticals
Photoshop tips and tricks
In this section – tips and tricks to help you get the most out of Photoshop.The Perspective Tool
Sometimes you might want to distort an image to either correct something, or make a photo more dynamic. This month I’ve used another photo from Prague to show you how this tool works.
There’s a before and after photo below to show you what we’re doing here.

The “before” has converging verticals. They’ve been corrected in the “after” photo. So how’s it done?
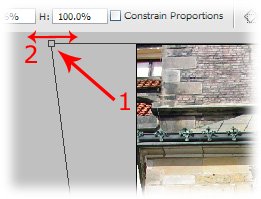
Open your photo in Photoshop, and then go to image then choose transform and then perspective. A bounding box will appear around your photo.
Grab one of the corner handles (see arrow 1 below), and then slide it from side to side (arrow 2 below). Your image will distort as you do so.

Slide the image until the verticals are, well, vertical again! Although take care – sometimes this makes photos look a little unnatural. It’s often better to adjust the verticals, but don’t make them completely straight.
Further reading – the newest photography tips and tricks!
Here’s the latest additions to the site, and a few other highlights, – always worth a look . . .Help Wanted!
My aim is to share digital-photography-tips.net, and this newsletter with as many people around the world as possible– helping the whole world take better photos!If you know of someone who would be interested in receiving this newsletter, please forward this email onto them, and ask them to click here, or send them this link:
https://www.digital-photography-tips.net/Digital-photography-tips-newsletter.html